
When purchasing any software, it is important that it is compatible with your devices. It can be frustrating and a major roadblock in reaching your technology goals to have access to the latest in productivity and collaboration tools only to find that they are inoperable with your inventory. The COVID-19 pandemic has led to a Chromebook shortage as institutions migrate to Google Workspace for Education for a solid digital infrastructure and permanent adoption of the 1:1 model. To ensure continuity of learning, many schools have needed to utilize other devices to supplement the gaps in their fleet. Unfortunately, non-Chrome OS devices cannot be managed in the cloud-based Google Admin console. Amplified IT’s mission is to empower institutions to get the most out of their Google Cloud, and that includes the devices they need. With our new Support Stack, CloudReady, it won’t matter if you have Chromebooks, PCs, or Macs.
Google and Neverware
Neverware, the technology company that began turning other computer devices into Chromebooks, was acquired by Google in December of 2020. Neverware’s CloudReady software has officially become a Chrome OS offering to support Google for Education in being a suite of resources for teaching and learning. With Google, CloudReady’s newly adopted technology provides institutions with greater reliability and centralized support to synchronize their Google Workspace for Education domain with even their non-Chrome OS devices. This promotes the expansion of equity and accessibility of EdTech to students in this current and progressing digital age.
Cloud-ready support
In April 2021, Amplified IT’s support team added 3 categories of support to our Support Stacks service. The CloudReady stack is the latest addition and the ultimate solution to ever-present challenges institutions are facing with accessibility to Chrome inventory.
CloudReady is an operating system based on Google’s open-source Chromium OS. It allows your IT department to essentially program non-Chrome OS devices to act as another Chromebook in their fleet. These devices can then be enrolled in the Google Admin console alongside your other Chrome OS devices and yield the same control and visibility you need to seamlessly manage them.
Get CloudReady
Institutions can install CloudReady on an eligible PC or Mac for free, but need a CloudReady license and a Chrome Enterprise Upgrade to begin enrolling devices.
Licenses
Between now and July 8, 2021, Neverware is offering a license and upgrade bundle deal. If you purchase a minimum of 20 or a maximum of 500 Chrome Education Upgrades, you’ll receive the same number of CloudReady annual licenses at no additional charge for the first year. After that, you can transfer those Chrome Education Upgrades to your arriving Chromebooks within the first year or continue with paid CloudReady licenses on your non-Chrome OS devices.
Install
To install CloudReady on your devices, you will need an 8 GB or greater USB drive.* You can either manually create a bootable USB or use the CloudReady USB Creation Utility.**
With the CloudReady USB Maker Utility Guide:
1. Upon obtaining your licenses, you will have access to your my.neverware.com dashboard. You can then download the USB maker from within the Downloads tab.
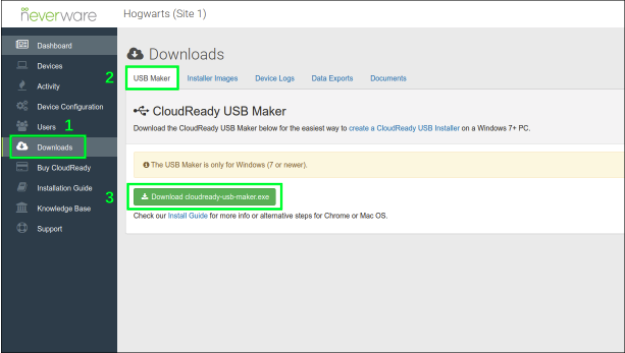
2. Once downloaded, open your Downloads and launch the cloudready-usb-maker application. This application requires administrative privileges, so make sure to choose Yes on any security prompts from Windows.
3. After that, you will follow the prompts that the USB Maker provides.
By manually creating a bootable CloudReady USB drive:
1. First, download the .zip file from my.neverware.com on the Downloads tab.
2. To create your CloudReady USB installer, you need to add the Chromebook Recovery Utility to your Chrome browser. After it is installed, the Chromebook Recovery Utility will show up on the Apps page of your Chrome browser.
3. To access the Recovery Utility go to chrome://apps in your address bar and click on Recovery.
4. Once launched, you should see the below screen.
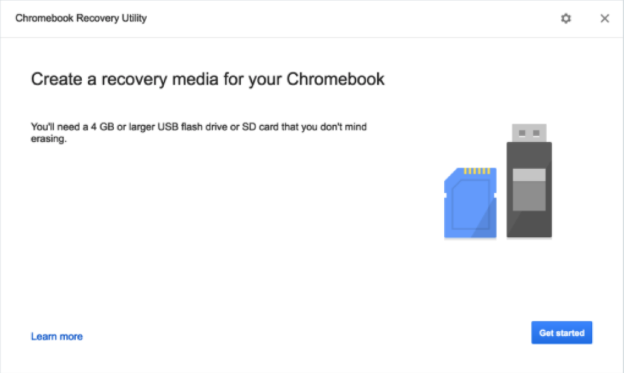
5. Locate the gray gear icon on the top right of the window, and select Use local image from the drop-down tab.
6. Locate the cloudreadyXXXX.bin.zip file in your Downloads folder.
7. When prompted, you will insert an 8 GB or larger USB flash drive and choose the corresponding drive on the screen.***
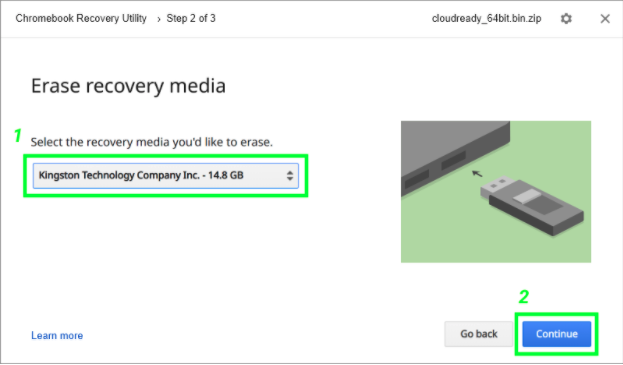
8. When the process is completed, remove the USB flash drive.
Now that you have a CloudReady Boot USB you are ready to install CloudReady on your device. Simply plug the USB into the device you want to install CloudReady on, power it off, and boot it from the USB by repeatedly pressing the device’s special boot key.
Below is a list of the most common models and their corresponding keystroke:

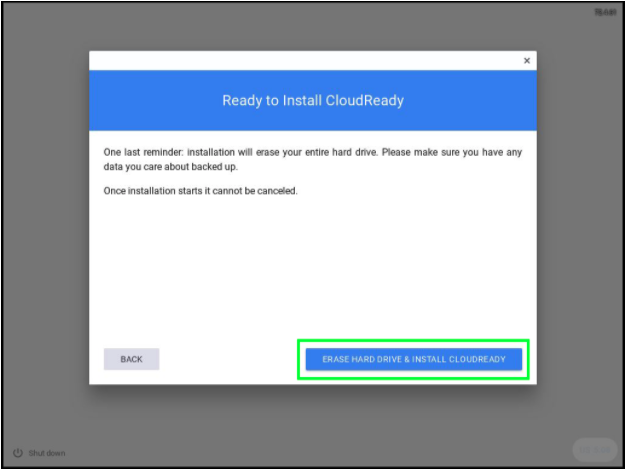
If the correct keystrokes were made, you will be prompted to select the USB device with the CloudReady installer. A white splash screen with the CloudReady logo will appear. After you have chosen to backup existing data or not and are confident to proceed with the installation, the process should take 5 to 20 minutes depending on the speed of the USB and the device’s hard drive.
When the installation has finished, your machine will shut itself down completely. When you’re sure your machine is powered down, unplug the CloudReady USB installer and power the device back on.
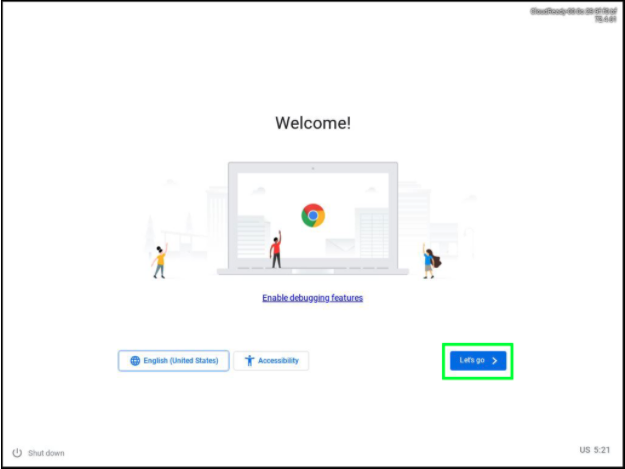
From there you will be able to adjust language and accessibility settings, and enroll the device in your Admin console just like you would with any other Chromebook device.
Note:
*Preferably not a Sandisk device.
** If you have any Windows 7+ machines to create the USB drives, you will want to use the CloudReady USB Maker.
*** During the process, it is normal for the utility to show unusual percentages. Proceeding with this step will erase the target flash drive. Proceed with caution.
CloudReady helps institutions effectively and efficiently synchronize their Google Workspace for Education environment with all their EdTech devices. Amplified IT’s CloudReady Support Stack provides customers with hands-on guidance in obtaining licenses, upgrading Chrome, installing the software, and device set up and enrollment in less than 10 total hours of their contracted support time.
Let our support team ensure your administrators, educators, and students have access to the right tools on the devices they have, even if they are PCs or Macs. Learn more about support and Support Stacks from our support guide.
If you do not currently have a support contract or want to add additional hours, contact your regional account manager.
To purchase one of the Support Stacks or utilize the CloudReady stack, connect with the support team by emailing support@amplifiedit.com.
-

Catherine Weers
Onboarding & Engagement Consultant -
About the Author:
Catherine lives in Virginia Beach, walking distance to the Chesapeake Bay where she is Amplified IT’s Google for Education Onboarding and Engagement Consultant. Catherine joined the Amplified IT team in 2017 after serving in public schools for 13 years as a teacher in addition to various technology roles. Her current role as Onboarding and Engagement Consultant allows ample opportunity to empower schools, while sharing best practices to get the most out of the cloud solutions they adopt. In her spare time, you can find her at the beach with her family, likely chasing her 2 young daughters and petting all the dogs.